Question: Is this film okay to have online?
-
Answer: We were inspired to make this film after viewing many different lightsaber battles (including those from the Star Wars movies). Some of these ‘fan film’ videos were hosted on TheForce.net, and were posted freely. According to TheForce.net, LucasFilms doesn’t worry much about fan films as long as they don’t infringe on other companies’ copyrights. From TheForce.net’s Filmmaking FAQ Page:
-
Are fan films legal?
-
Legal in the sense that you won't get in trouble for them - yes. Most fan films do include material that is copyrighted and trademarked by Lucasfilm, but the wonderful people there know that it is the fans that keep them going so they pretty much let fan films get away with using trademark characters, locations, ect. When making a film, be careful if you are going to use characters from movies or books that are not covered by Lucasfilm, such as Star Trek or Superman, as those companies may not be so generous. A recent Superman fan film was shut down because of copyright infringement.
-
Can I buy/sell fan films?
-
NO. No, no, no, no, no. Films may be distributed without profit only. If you make money from a film, it is considered copyright infringement and may force Lucasfilm to come down hard on not only your film but EVERY fan film. This is a sensitive issue and for the sake of fan film makers everywhere, please do not attempt to sell a fan film on eBay or anywhere else. If you want to give your film out on a format other than the internet, it is suggested that the individual give you a disk or VHS tape for you to copy the film on to and give back to them. There is a very thin line between making a profit and not, for which it is better to play it safe.
______________________________________________
Question: Where can I discuss this movie?
-
Answer: Please post any comments you may have about the movie in the comments section of this blog posting.
______________________________________________
Question: How did you make the lightsabers you used in the film?
-
Answer: The short answer: We went to the toilet parts aisle at Lowe’s (or Home Depot), walked around looking for various toilet gaskets, seals, O-rings, pipes, and other such objects that fit together, and glued them together using a super-strong glue called ‘Welder.’
-
The long answer: We started all the saber handles we made by purchasing a chrome pipe that was 1.25” in diameter and 12” long (Lowe’s item number 46823, cost: $4.94).
-
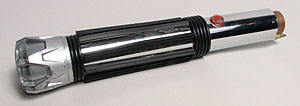
Mike’s Lightsaber -
For Mike’s handle, Mike bought a sink faucet that fit right onto the end of his chrome pipe, and spray-painted the faucet chrome using paint he bought at an arts and crafts store. After the sink faucet at the bottom, mike put on a variety of O-rings (costing less than 50¢ each) and cut-to-size windshield wipers for the grip. For an on/off switch, he glued on a red circular thing he found in his room, and had a piece of metal glued on (which fell off during filming) at the tip of the saber for the crystal-adjusting knob. On Mike’s saber, the end was finished with a Dremel tool, giving it a menacing look (see the picture above).
-
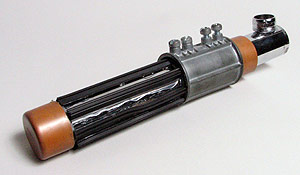
Ed’s Lightsaber -
For Ed’s handle, Ed capped the end with a 1.5” diameter copper tailpiece (Lowe’s item number 24746, cost 98¢), securing it using duct tape wrapped around the end of the chrome pipe, and Welder glue on that. As on Mike’s saber, Ed used cut-to-size glued on windshield wipers for the grip. To add weight and an industrial look, Ed added a pipe fitting with four screws on it (found in the electrical aisle for a couple bucks) and tightened it to the chrome pipe by tightening the screws, and using a copper 1.25” coupling (Lowe’s item number 222519, cost $2.42) under the front of the pipe fitting. He cut the chrome pipe to size using a hacksaw, and glued a chrome sink pipe fitting onto the end to act as the blade crystal adjuster.
-
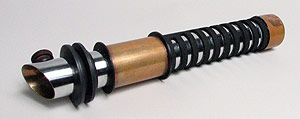
Jeff’s Lightsaber -
For Jeff’s handle, Jeff used the same end cap as Ed, but cut long holes into a felt sheet, and glued the felt sheet onto the pipe for the grip, giving a Qui-Gon Jinn-esque grip style. Then he put on two plastic pipe fittings, after spray-painting them black, to hold a copper pipe coupler in place; all these items were secured by wrapping duct tape on the chrome pipe, then fitting the pieces over the duct tape with Welder glue. He then pushed two 1.25” rubber ‘mack washers’ (Lowe’s item number 26624, cost $1.27 each) onto the end, and glued a rubber squishy thing (Lowe’s part number 202181, cost $1.78 for a bunch of ‘em) that was spray-painted black onto the tip as a button/crystal adjustment knob. For the tip, he used a hacksaw to cut the pipe at an angle, reminiscent of Anakin’s Episode III saber end.
-
The average cost for all the supplies to make one lightsaber from toilet parts (and other miscellaneous parts) was $25.
______________________________________________
Question: What did you attach to your lightsabers so you could make them glow?
-
Answer: After making the saber handles, we each took a 3/4” x 12” copper pipe piece (Lowe’s item number 24711, cost $4.64), cut it to size (Mike’s sticks out a little from his chrome saber, for dramatic effect), and wrapped duct tape around it to slide it into the saber hilt, liberally applying Welder glue to the inside of the chrome pipe so the copper pipe would stay where it was supposed to be.
-
What it looks like without the blade lit (you can see the banged-up dowel rod to the left) -
We then went to the lumber section of the store, and found 3/4” wooden dowel rods (make sure you find straight ones!) that fit (sometimes with a little sandpapering) into the ends of our lightsaber handles. We then spray-painted these dowel rods the color that we wanted our character’s lightsabers to be (Jeff = green, Mike = red, Ed = blue), and pushed them into the copper pipe, making sure that they were securely in the pipe; it would’ve been bad for one of the dowel rods to fly out and hit someone!
-
Attaching the dowel rods in such a fashion easily allowed us to remove the blade part when needed, without using a drill press to make some sort of ‘cotter pin’ securing device in our lightsabers.
______________________________________________
Question: What software did you use to make the lightsaber blade effect/how did you make the dowel rods glow?
-
Answer: We did the lightsaber effect using Adobe Photoshop CS QuickTime Pro and Final Cut Express (see note at bottom if you use a different editor), adopting the method outlined on this website [alienryderflex.com]. I’ll outline the basic steps:
-
1.Download and install the saber_actions.zip file from the above website, following their instructions.
-
2.After editing the film to a final or almost-final edit, export it as a full-resolution Quicktime Movie (the highest quality you can).
-
3.Open the movie in QuickTime Pro, and export it as an ‘Image Sequence,’ using a framerate of 29.97 frames/second (if you shot your film with a digital video or ‘DV’ camera).
-
4.Open each image in Photoshop (I opened about 20-40 at a time), and draw a line or a polygon (if the saber is in motion, and isn’t a straight line) over where the lightsaber is.
-
5.Run the appropriate Photoshop action from the above-linked website (I used mostly Red and Blue 2.0, but a larger size (4.0) for some of the closer shots).
-
6.Save the edited files (which now have the lightsaber glow added).
-
7.In QuickTime Pro, click on the File menu and choose “Open Image Sequence...,’ then select your first image in the sequence, and click Open.
-
8.After the video opens (which may take some time), Export it as ‘Movie to DV Stream,’ then import this file into your video editor, and place it where the un-lightsaber-ed video was.
-
NOTE: Many people use a program such as Adobe Premiere instead of Final Cut Express or Final Cut Pro - you can use the same method outlined here, with minor adaptations. There are other websites outlining how to do this with Premiere (Google them!). Another great resource is Ryan-W’s website, more specifically his FAQ page.
-
It is harder (but not impossible) to do this using iMovie or Windows Movie Maker (or other programs, because you can’t always place the video where the old video is without taking out the audio too. Also, the sound editing is much harder in a program that doesn’t allow for at least 10 or more audio tracks. (I’ll discuss the sound/audio editing later).
______________________________________________
Question: How did you do the force effects (like when Mike uses the force to grab his lightsaber)?
-
Answer: We tied or taped a piece of fishing line to the object which was to be pulled, and had someone pull the object from off-camera. On a few of the clips, Jeff edited out the string (using Adobe Photoshop) because it was visible (especially in the shot with the book in the computer lab).
-
After filming the object being pulled with the fishing line, we would film a clip of the object hitting Ed or the lightsaber getting caught by Mike from a different camera angle, and Jeff would later edit the scene to make it look like the object was moved using the force. Also, whenever the force is used, there is a low rumble sound (a similar sound was also sometimes used to signify a strong influence on the force in the Star Wars movies).
-
Using fishing line allowed us to film the object as if it really were being pulled by the force; if we had simply reversed a clip of the object landing, it wouldn’t have looked as natural.
______________________________________________
Question: How long did it take you to make this video?
-
Answer: In all, the better part of two weeks (spending a few hours each day working on the video).
-
We did all the filming, plus a few pickup shots (footage we forgot to shoot during initial filming) in about 5 hours over a two-day period. Importing, sorting and editing the video took about two days, and sifting through many websites and all the Star Wars’ lightsaber battles (using a program called Sound Studio) to find lightsaber sound effects took about two days. Most of the rest of the time was spent on frame-by-frame lightsaber editing in Photoshop (at least six days’ worth of work... luckily we had one week off at the start of our summer vacation!). Finally, the sound editing and musical editing (using some Star Wars songs) took about a day and a half. Jeff then spent some time tweaking certain parts and compressing it for the web.
______________________________________________
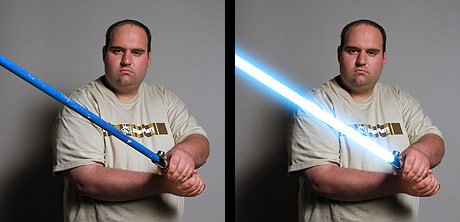
Question: How did you make the lightsabers ignite?
-
Answer: Every time we wanted a lightsaber to ignite, it took about three times as long to do that section of frames in Photoshop, because of the process involved in editing the video so you only see part of the saber, then a bit more, and more, until the saber is finally lit all the way.
-
We basically used what is called a ‘back plate‘ or ‘backing shot’ to do this effect. Basically, it requires you to put the camera on a tripod, shoot the scene in which the actor will ignite his lightsaber, then (without having moved the tripod or camera at ALL) filming the actor igniting his lightsaber, with the dowel rod attached. After you edit the video, you take a frame from the back plate and, in Photoshop, place it in a layer under the frames with the actor in them, then erase the part of the lightsaber that is not yet lit.
-
Some tips to help with this process: First, if your video camera has an ‘exposure lock’ or manual mode, use it; if the camera’s settings change at all, the back video will look different (i.e. the colors will not be exactly the same) from your actual footage, making the area you erase look weird. Second, you may have to adjust the Levels and/or color balance on the back plate shot, if the colors or brightness differs from the shot with the actor(s) in it.
______________________________________________
Question: What kind of video camera did you use for this video?
-
Answer: We used a Canon XL1 MiniDV camera for this video. We were able to borrow this video camera from the St. Louis Office of Youth Ministry. Using the XL1 allowed us to get very high-quality footage, especially indoors, where we could not always lug around lighting equipment.
-
It is important to get the clearest and sharpest image possible when trying to rotoscope (that is, edit frame-by-frame) lightsabers. If the sabers are moving very fast, they will look like a large blur in some of the video frames; in this case, if your digital video camera creates a lot of ‘noise’ (as most consumer cameras do, if your indoors or it’s dark), it will be very hard to see where to draw in the lightsabers.
______________________________________________
Question: How did you get Mike and Ed’s voices to sound so clear?
-
Answer: None of the dialog in this video is actually the dialog recorded on-camera. I recorded Ed and Mike’s dialog after editing the movie using a technique called ‘voiceover recording.’ We took my iBook down to the Seminary’s A/V room, and used a Shure KSM27 microphone through a Behringer mixer (the same equipment used for Priestie Boyz vocal recording!) and iMic audio interface to record the voices. I then adjusted the EQ and some other settings for the voice, and tried to make the voice synchronize to the video as much as possible (sometimes a syllable or two were off).
______________________________________________
Question: What sounds were recorded by the video camera, and what did you add?
-
Answer: The only sounds that I used in the film from the actual footage were the footsteps, the lightsaber falling on the ground and the different objects moving and hitting Ed and Mike. Other than that, I used a variety of sounds that I have from a sound FX library, as well as from my own ‘foley’ recordings for all the door creaks, closings, and openings, the wind on the tower, the sparks, the thunder sounds, and background (ambience) sounds.
-
The lightsaber sounds (waves and clashes) were all short clips of audio from the Star Wars movies or found online at TheForce.net’s Fan Film site.
______________________________________________
Question: Will you ever do this again?
-
Answer: Probably not. You probably don’t know how long it takes to make a video like this; I can’t imagine having the time to do this again...
______________________________________________
Question: Will you make me a lightsaber handle/hilt?
-
Answer: No. It is quite easy for you to make your own. Go ahead and do it (see the question above, “How did you make the lightsabers for your film?”) – and be creative about it! There are many ways to make a unique lightsaber handle, and you can even make it look very much like the ones used in the Star Wars movies, too.
-
You needn’t follow our advice (toilet parts aren’t the only material used to make lightsabers). Google ‘how to make a lightsaber’ and see the hundreds of other ways you can make a lightsaber out of simple, inexpensive parts.

FAQs: Frequently Asked Questions